Homeschool Room Tour 2014-2015

It’s the day before school starts!

Not going to lie, I’m a little excited LOL.

I’m still working today on our school room and getting everything ready, but since this is probably as clean as it’s going to look for a while I wanted to share our homeschool room with you even though it’s not finished.

*Background*

We live in a three bedroom house – we only need to sleep in two of those rooms.  So, a few years back Chris and I moved out of the master bedroom and into the “guest room” on the other side of the house – the main reason, the back bedroom is at least 10 degrees cooler on any given day than the master suite is.  That left us this HUGE space (not even kidding, the room measures approximately 17ft by 11ft and is nearly 1/3 the floor space of our entire house when you include the bathroom and closet parts of the suite).  Until about a month ago, this room was the “multi-purpose room”, it held my office space, our homeschool space, an exercise machine (collecting dust) or two at any given time, and all my craft and sewing stuff.  It was often messy and cluttered.

Our homeschool space at the beginning of the 2013-2014 school year.

Our homeschool space at the beginning of the 2013-2014 school year.

I worked out a corner of the room to hold our supplies and do school in last year.
Fast forward to May and the decision to work hard toward selling the house.  I/we did A LOT of purging in this space (still ongoing but mostly done).  Countless trash bags full tossed away, boxes and boxes of fabric and craft supplies donated and thats just some of what we got rid of.

Then the real work started.  We spent well over two weeks scraping popcorn off the ceiling, painting, cleaning, rearranging furniture, and organizing.

Technically the room isn’t done.  The ceiling needs a second coat of paint, we will be ripping out the carpet and replacing it with flooring, and we also need to replace the baseboards and curtains, but school is about to start and I needed a functioning space, so those projects will all have to wait.

In the mean time, I want to show you the amazing transformation of this room.

First let me give you an overview of our main school space.

Like I said, it’s not 100% ready yet, but it’s pretty close.
Inara and I have separate desks this year, which are in an L Shape.  Her’s is my grandmother’s wooden desk and I have a five foot folding table.  You can also see our we chose virtues posters hanging on the wall (I used tape so as not to put holes in the walls) still trying to figure out what to do with the cork board since again I don’t want to put huge screws int he walls to hold it.  The 7ft tall bookshelf holds what feels like the whole world.  It’s got all our curriculum, manipulatives, some chapter books to use for read aloud time, and still has extra space.  Next to it I have a rolling file cart that holds extra file folders and paper, the top drawer holds extra supplies and the middle extra manipulatives.  On top of that is a paper sorter for our colored paper (I’m super excited by that little gem).  You can also see Inara’s new neon pink wiggle seat, I’m excited to add this tool to our classroom this year.  For those unfamiliar it’s a 14 inch round disk inflated to about 3 inches high, but not firm.  It’s got two different textures on the top and bottom.  It allows for sensory input/simulation, noise free wiggling, core strengthening as they attempt to balance on it, and extra bonus it’s fun to sit on (yes I’ve tried it) or play with.
IMG_8775

This is a more detailed view of our bookshelf and supply area.  I’m going to try something different this year with our AAR and AAS (all about reading and all about spelling) letter tiles and store them on a magnetic board separately and use a small white board rather than the big wall mounted board.  In part because, again, I don’t want to put holes in the walls to hang the big board, and also because I found the large board more awkward to use last year.  It’s not far away so we can still use it, maybe sitting on the floor, for other things or at certain times, but not daily. (and yes, I love my label maker and my boxes from Container Store)
IMG_8776

On the back wall of our space I have an awesome school mailbox that a friend gave me, it will function as our workboxes this year.  On top I have a small display of flags (purchased from Smallflags.com) which will be used to say the school pledges, which are printed and laminated next to them.  I also have our US map hanging (I did use push pins for this – sorry Chris) since we will be studying US geography this year.
IMG_8774

On the wall opposite our school area is the new family computer area.  Chris and I both have our computers set up sharing an 8ft folding table.  Chris is working to implement networked logons, so any of the three of us can log on to either computer and find all our appropriate files and settings.  Chris just finished setting all this up on Monday afternoon while I was at co-teacher training.
IMG_8772

Next to the computer area is our new reading area.  I’m more than a little excited about this cozy spot, even if it does still have computer cables and parts stacked on it from Chris’ work in the space on Monday.  I love that Inara and I will have somewhere else to sit during school to read together, and somewhere for me to retreat to at other parts of the day where I can curl up with a book or do my quiet times.
IMG_8773

Not pictured is the fourth wall of the room, which will be our movement area.  We have an exercise bike, and will also be putting Inara’s trampoline in that area.  It’ll be a place for her to get some energy out during school.  We often do memory work (poetry recitation, bible verses etc) while she jumps on the trampoline, or I’ll have her bounce and count to 20 or 100 for math practice.  She also enjoys using the bike to get some energy out and some movement going in her legs.

Well, there you have it, (most) of our school area.  

I’ll be sharing this post here: nbts-blog-hop-2014

Custom School and Life Planner

Well, it seems like just yesterday I was posting the last installment of my Life Management Binder, when in reality it was over eight months ago.


And here I find myself at a juxtaposition.  I still really like the binder I made, the system worked great for me, and I LOVED the size – especially when it came to stashing it in my purse.


Here’s the problem I faced, as a homeschool mom, I had no where to plan lessons, keep track of school related to-dos, projects shopping lists, or anything like that.  I ended up creating a separate three-ring binder for my lesson plans, and by the end of the school year last year found myself totally disorganized regarding school related items.


So, I wanted to combine the two… I started shopping.

I’ve said before I love the look of Erin Condren Life Planners – but man, the price tag – and it still wasn’t customized really.  Personalized yes, but customized no.

Somewhere in there I also realized that what I needed was a school planner, not a life planner.  I needed a place for school stuff!  I did more research and actually bought a copy of The Well Planned Day, a homeschool specific planner. 

When it arrived, I opened it up, and it dawned on me – it didn’t have a “normal” calendar area.  DUH!  This was a teachers planner, not a life planner that included teacher stuff.
I shipped it back.

I did more research.

I forced to conclude that what I wanted doesn’t actually seem to exist anywhere.  I wanted a full and total life planner.  I wanted something that would combine my daily calendar and my lesson plans.  Extra awesome bonus if it looked pretty, and free cookies to all if it also included areas for my cleaning lists, notes, birthday lists and other stuff.

Yeah, no such thing exists.

So then I came to the conclusion, if thats what I wanted, I’d have to make it… 

again


Then began the hunt.  I started going back through my Pinterest boards, looking for stuff I’d pinned when planning my Life Management Binder, also looking for homeschool planner stuff.

In the end I found two things that really helped – extra bonus they had free downloads too.

First I found Mama Jenn and her Homeschool Planning Pages.

I love that her pages have a system that easily translates into planning out Inara’s workboxes, as well as divisions in the actual subject areas for two part lessons.

Next I needed a day planner.  Something with a full week, space broken down for scheduling during the day, a to-do list area, and a place for small notes (like what Inara’s AWANA verse that week is or something similar)

Enter Miss Allison’s Art, and her homemade planner. Extra bonus here, the download documents are totally customizable, and she shows you how she put hers together.


Downloads in hand (or on disk) I spent some time customizing the planner sheets to include what I wanted.

Then, I printed.  I printed one set of each download and did some tallying.  I figured out how many weeks of active school we have, and thusly how many homeschool planning weeks I needed.  Then I subtracted that figure from the number of weeks in a year.

I figured out I’d need 33 sets of school planning pages and 19 sets with no school planning pages.

Off I went to Office Max.  The nice guy there helped me figure out the self-serve copy machine and I made back to back copies of what I needed.  As I flip through my book first I see the weeks day planner (our normal family planer), then when you turn the page it’s the weekly homeschool planner.

IMG_8756

IMG_8757


Next I needed to figure out what the rest of my planner needed.

In the end I had six sections that would need to be divided out.

Off I went to the craft store next, on the hunt for “pretties”.  I hoped to find a nice card stock scrapbook page for the cover, but nothing caught my eye.  Instead I found a “normal” type scrapbook paper with fun rainbow style diagonal lines.  I took the theme and ran with it.

I bought the scrapbook page, and also sheets of solid colored 8.5×11 card stock following the ROYGBV color pattern.  I also grabbed some extra purple (my favorite) for some decorating.

I trimmed the rainbow sheet and glued it to the red card stock.  Found a template for a marquee shape and using MS Word, that template, and my extra purple sheet I created a design for the front cover.

IMG_8745

On the inside of the cover, I printed out and glued on a basic at a glance style school year calendar and also used the same (although much smaller) marquee for a name plate.

IMG_8746I like a bold outline, so using a sharpie I outlined the marquees and the calendar, I added it to the pile to be laminated (more on that in a second)

Right after the cover is my cleaning list areas.

I used my trusty FlyLady plans and printed out my daily routine, weekly plan, and detailed zone lists, all of which would get laminated.

The next section went behind the orange sheet and has about a dozen pages copied back to front for notes.

IMG_8750

Next up, behind the Yellow divider is my first school specific section.  Here I included the curriculum shopping list for the year, our school supply list, and a school years worth of monthly reading logs.

IMG_8751 IMG_8752 IMG_8753


Behind the Green divider is a copy of our school’s academic calendar.

IMG_8754

In the Blue section is my family birthday and anniversary list

IMG_8755

And then lastly behind the purple section is where my actual calendar and planer pages are.


After I had everything copied, printed, organized, and planned, I went to our local teacher store and laminated what I needed laminated.  I laminated the cover to try and keep the pages glued together longer, the cleaning pages so they could be used as checklists with dry erase makers, the school academic calendar for longevity, and the same with the birthday list.

After everything was laminated, I went back to office max (or maybe it was Office depot the next time) and had them bind it for me.  I chose a black plastic spiral binding, and also paid the extra couple bucks to add a nice sturdy clear plastic cover over the front of the whole thing, and a black plastic cover on the back to add stability.

IMG_8758

All in all, I spent several hours of my time, and somewhere between $40-$50 for supplies, laminating, and binding.

In the end though, I have a 100% customized whole life planner for the school year that I LOVE.  In the month since I finished it I’ve used it lots, and can’t wait to see how it holds up over the course of an entire school year.  The only thing in hindsight I didn’t include and wish I had was an area for menu planning and shopping lists.  But now I know that for next year. 🙂

We have a BATHROOM!

A little history.

We bought our house in July of 2006, with the plan that it would be a starter home 5-10 years max.  In the eight years since, we have simply outgrown subdivision living, and our interests have outgrown our land.

I was five months pregnant with Toby, and we felt like we needed to be in a house, and after having several sold before we could make a move on them, we finally found this house and bought it.

We settled, and we didn’t have a great real estate agent.

But, we had a house.  It had a nice pool, it was on a big lot for a subdivision, and we moved in.

From the get there were lots of things that needed attention.

Nearly every room in the house needed at least a paint job, many needed more than that, but I wouldn’t call it a fixer-upper, just in need of some TLC, and our personal touches.

So we thought.

When we came to look at the house the 2nd bathroom looked like this:


OLYMPUS DIGITAL CAMERA

OLYMPUS DIGITAL CAMERA

OLYMPUS DIGITAL CAMERA

OLYMPUS DIGITAL CAMERA

OLYMPUS DIGITAL CAMERA


Yellow 4″ square porcelain tile in the shower, yellow walls on three sides with a fourth wall white, a sponged on fish border, dark pecan wood cabinets and medicine cabinet that had been stained over with blue.

It was… not our taste.

We painted it all white with yellow and blue spots lightly added in, painted the woodwork a bright medium blue, and replaced a fish theme with a rubber ducky theme.

Somehow this is the only picture I have of that:

IMG_0386


Not even 6 months after this picture was taken, we discovered there was a problem.

Water had been leaking behind the wall of the shower for some period of time, and the drywall was rotting.  Tiles were starting to fall off the shower surround.

With the help of a couple guys from our couples bible study, Chris tore the shower and tub, and really half the bathroom, down to the studs, and then he chiseled out (by hand!) the saltio tile from the floor!
And there it sat, for nearly 5 years.

Until last month, when a tub went in!

photo


We hired a friend of ours who is a contractor to do the tub, cement board, and tile work – and the stuff that goes with all that.

He did an AWESOME job.  Seriously, if you’re in the area and you need work done, contact Jacob Clyde – the guy can get stuff done, and it’s GREAT quality work!

After Jacob did his part, the rest was up to us.

But, I’m SO SO happy to say – it’s done now.

We put the finishing touches on it TONIGHT!

photo

Continue reading

Menu Plan Monday – Two Week Plan Part 2

Yes, I know it’s Wednesday – lets ignore that fact OK. Thanks

MPMcustom

I wanted to follow up last weeks post with a bit more info from our most recent (Friday) cooking session.

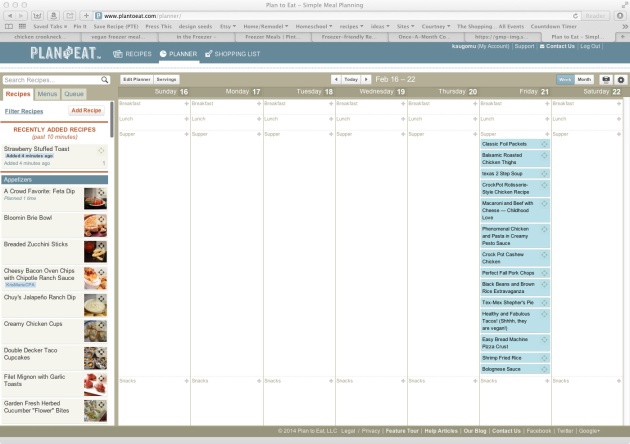
This was our finalized menu plan for the two weeks worth of prep:

Untitled1 copy

Classic Foil Packets

Balsamic Roasted Chicken Thighs

Texas 2 Step Soup

Crock Pot Rotisserie-Style Chicken

Macaroni and Beef

Chicken and Pasta in Pesto

Crock Pot Cashew Chicken

Fall Pork Chops

Black Beans and Brown Rice (V)

Tex-Mex Shepherds Pie (V)

Tacos (V)

Pizza

Fried Rice

Bolognese Sauce

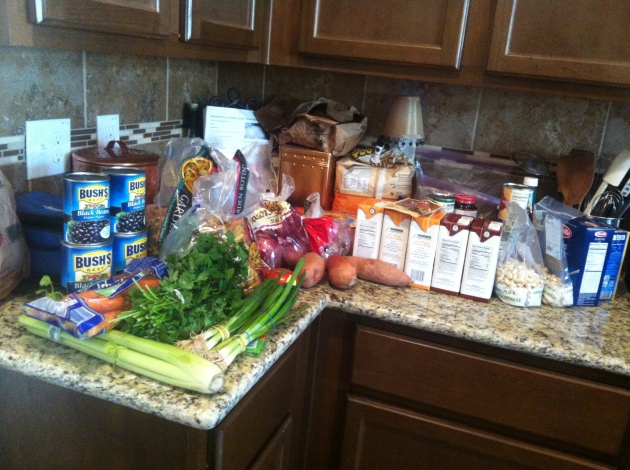
So after shopping and everything, we gathered at Erin’s house ready to get started.

Groceries are unpacked

IMG_6505

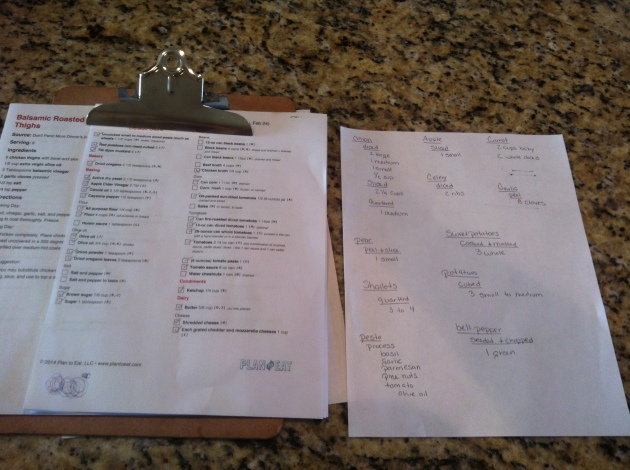
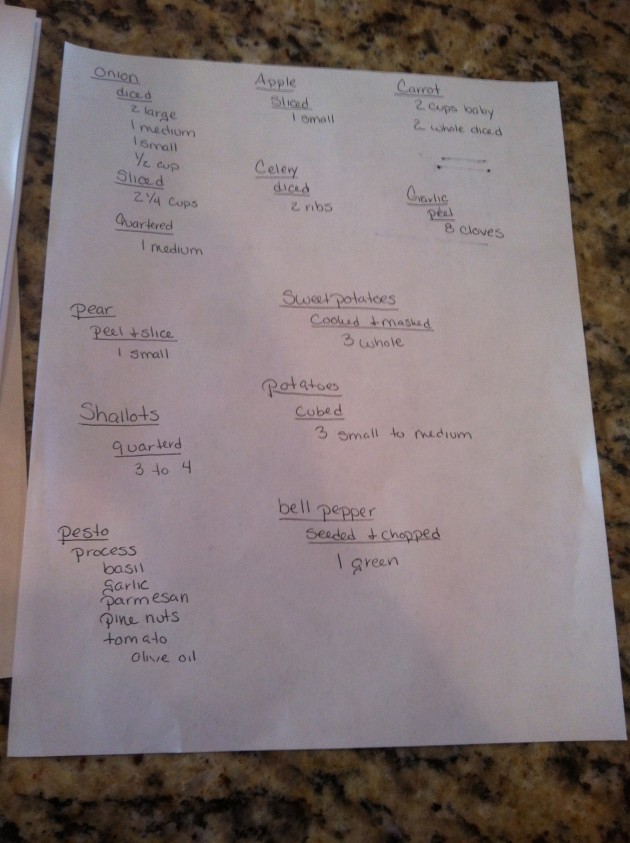
Step one is always veggie prep – anything that needs cut, chopped, diced, sliced, or pre-cooked is added to a master list which is generated mostly from the shopping list and recipes:

IMG_6506

Once that is figured out, the prep list is placed in a common area and we both dig in with whoever needs to happen.

IMG_6507

IMG_6509 IMG_6510

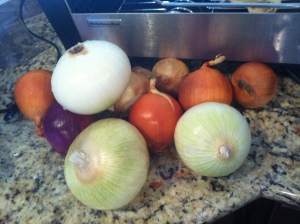
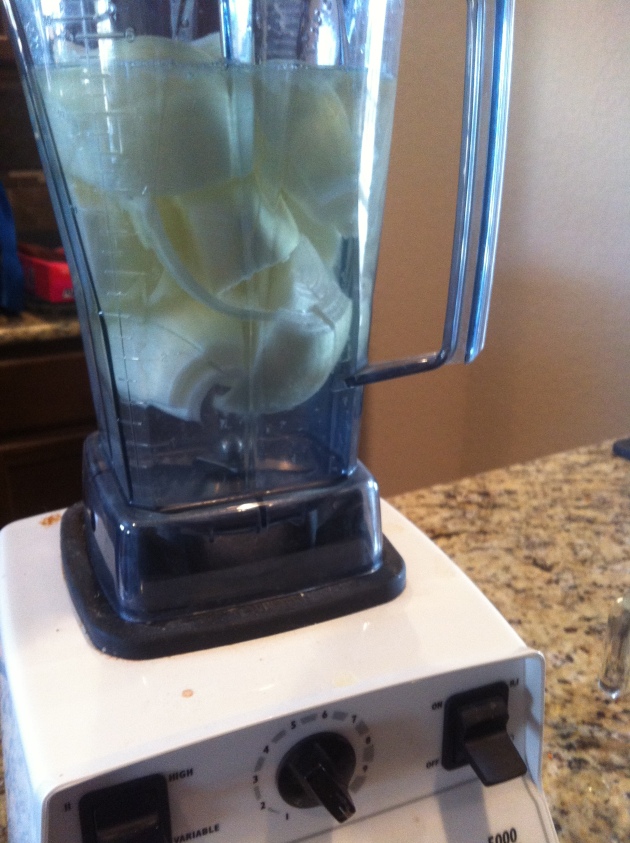
Random tip: put the onions that need to be diced or minced in a vitamin with some water pulse a couple quick times and you’ve got your onions done!

IMG_6511

Once everything is prepped the recipes start getting put together assembly line style.  Unfortunately once this “real” work started my picture taking stopped.  Essentially most of our items get frozen in ziplock bags.  Anything that can be precooked is, anything that can be premixed is, casseroles that need to be layered get put together right in our casserole dishes and frozen that way so all we have to do is thaw and cook.  Our main goal is to do as MUCH as we POSSIBLY can on this one day so that when the time comes to actually feed our family almost everything is done.  We may have to cook some pasta, we may have to dump bags of ingredients into the crock-pot or rewarm things in the oven, but for the most part everything is ready to go.  We’ve even pre-cooked rice and frozen it for things like the fried rice and the black bean and brown rice dishes.

As we finish each dish – they are placed into their freezer dishes (gallon sized bags mostly) labeled with a family name so we know who’s is who’s and the dish then they go in the freezer until they are all divided up and I take mine home.

That’s really it.  It takes us all day (I think we cooked for 12 to 14 hours this week) but I’ll happily sacrifice one day twice a week in the company of a good friend to feed my family healthy home cooked meals with little to no effort the rest of those two weeks.

Be on the look out – in March my menu plans will feature plant based meals or meals that can be adjusted easily to be plant based.  With lent right around the corner, and my husbands cholesterol results in, it’s been decided that we will be removing animal products from our meals for the month of march and following a whole foods plant based diet like the E2 diet, Happy Herbivore, and a bit of the Daniel Fast.  Erin’s family (to my knowledge) will not be joining us on our meat free March so meals will still have the ability to include dairy, eggs, and meat as well for all my omnivore friends. 🙂

Menu Plan Monday – a two week plan, and another Plan to Eat review.

MPMcustom


You may remember back in July, I shared that I had started to use the site Plan To Eat for my menu planning.
Simple Meal Planning - Plan to Eat

Well, I still am and I still love it.  Since October though something even cooler has been happening, and I’ve been meaning to post about it and obviously I still haven’t.

See, I have this awesome friend – Erin.  In september my awesome friend, and her awesome family moved into a new house after being in a state of unrest and unsettled for nearly a year as they sold their home, started building a new house, ended up backing out of the home they were building because of complications, and then found this house and moved in.  Their awesome new house has an amazing kitchen.  Anyone see where this is going?

no?

Well, since October we’ve been getting together every two weeks after pay day (both our husbands work for the same company, so they have the same pay schedule which is handy) and cook enough meals to feed our family for the following two weeks.  It’s been AWESOME.

Our family at least has cut back on spending, and going out to eat over all, and when we are finished each time Erin and I both feel accomplished!  This friday is cooking day, so with any luck I’ll remember to take some pictures and I can show you how we’ve been doing the cooking.  For now though I’m going to tell you how I’ve been planning meals for two weeks at a time.

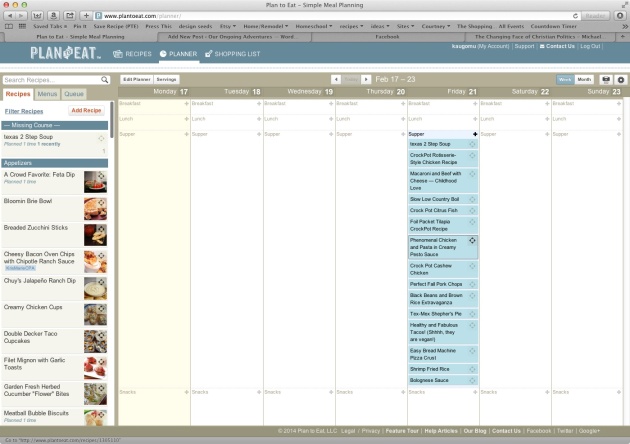
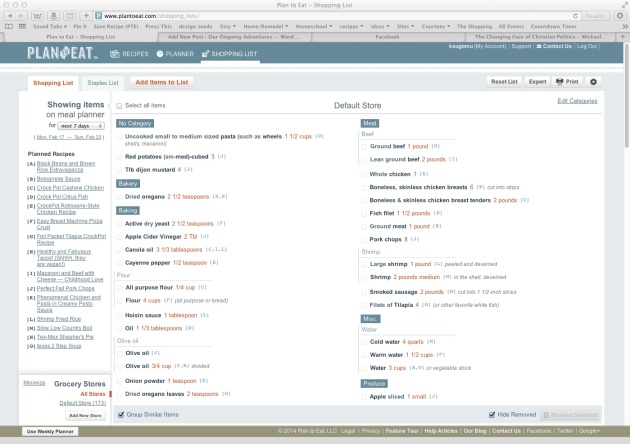
It all starts on Plan To Eat.  I go through all my recipes and pick out approximately 14 that will become our dinners for the following weeks.  If Erin has anything she or her family are wanting either she sends me a recipe and I import it, or we do some googling to find a recipe that will work (or that we think will work) and import that.

planner copy

One of my favorite things about Plan To Eat, is that from the recipes you plan, it automatically creates a shopping list from the recipes!

list copy

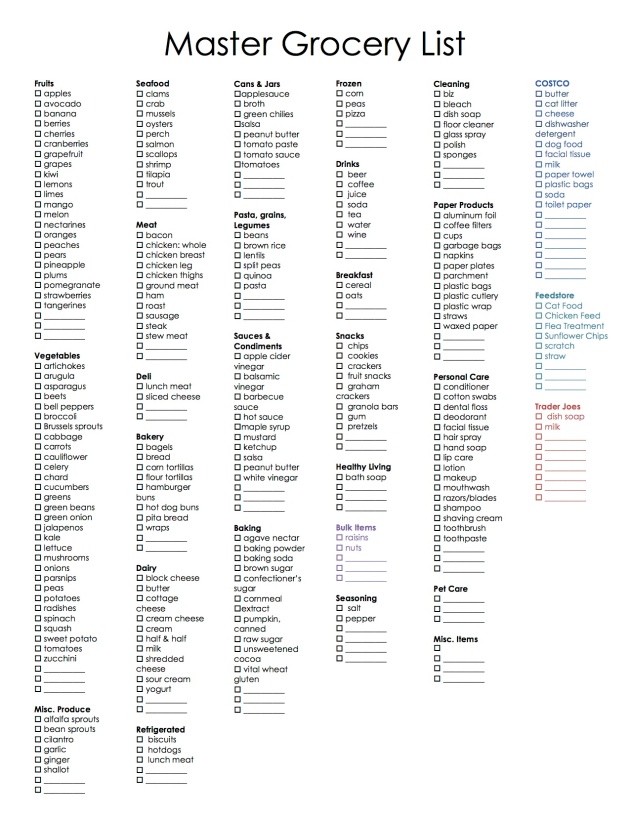
So, I take that list and review what I have on hand in my pantry, and what I need to get – anything that needs to be purchased gets added to my master grocery list (I have a downloaded version of this list that I have edited over the years to reflect how and where I shop).

Master_Grocery_List3 copy

So, we do our own shopping, buy what we need, and then spend an entire day cooking while our four girls run around, play, and generally create the chaos kids are known for all over the house.


After we are done cooking, both our families hang out, spend the evening together, and then we all crash at their house.  When our food comes home with us the next day, I put it in our deep freezer.  Here’s my favorite part and it’s taken me a while to figure out.  Once I put everything in the freezer I have to keep track of what’s in there, and have the recipes handy for anything that needs liquid (broth, water) added before cooking since we don’t add those before freezing them.  This is what I’ve come up with:

IMG_6482


I added a place on my freezer where I write down whats in there (the black lines are in sharpie so they don’t come off, everything else is dry erase and comes off easily).  I hang the recipes with a magnetic clip right there next to the list for easy finding (I move and file them once the meals are cooked, so only meals that are in the freezer are hanging in that recipe group).  When I take a meal out of the freezer to thaw in the fridge (it takes about two days in our fridge to thaw them, so there are always two out at a time, one for the day of, and one for the next day) I put a little mark next to the list so I know what’s out to cook.

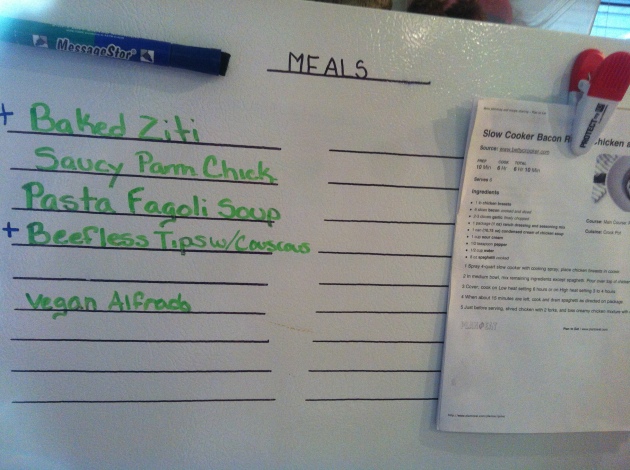
So, now you can see our menu plan for the week – tonight we are having Martini Beef-less Tips over Lemon Pepper Pearl Couscous, and tomorrow we are having Baked Ziti.

The best part of cooking together is that we both get to try things we may not have otherwise tired.  We are learning to adapt recipes for their omnivore family and our more leaning toward herbivore family so that everyone still gets their dietary preference, as well as we are figuring out how to adjust recipe sizes since I’m only feeding 2 adults and 1 child and Erin is feeding 2 adults and 3 kids.

My favorite part though is the camaraderie of another mom in the kitchen, our families spending time together, and the memories we are making.


Sharing this post at: mpm-1

LIFE MANAGEMENT BINDER: PART 4

Confession  I started this post back in November, and never finished it.

HOWEVER, I think this covers the final pages of printables for our life management binder, at least for a while, or until I update the printables with 2014/2015 info.  In this post we have downloads for holiday lists (including a place to keep track of school holidays or inservice days), To-do lists, a weekly menu plan, and easy baby sitter info pages you can fill in and hang on the fridge before you leave your little one(s).


I am planning one more post to show you the final product, and have a Q&A if anyone’s got comments/questions/suggestions.  I do hope you’ve enjoyed this series (although it has taken six months for me to make four posts – at least I did it all right?) and here’s hopping it makes your life a bit more manageable in 2014
holidays copy

holidays customizable word docx

holidays pdf

todo copy

todo pdf

weekly menu copy

weekly menu pdf

BabysitterInformation copy

BabysitterInformation customizable word docx

BabysitterInformation pdf

Looking for other installments in the Home Management Binder series?  You can find them here:

Part 1

Part 2

Part 3

Part 4

Life Management Binder: Part 3

I didn’t forget about you!  I’ve just been crazy busy with the start of school.  This year we are sending Inara to a new University Model school, so on top of the normal back to school stuff, there have been parent/teacher trainings and figuring out our homeschool day and lots of stuff like that – but I’ll save that for another post!

Last time I showed you pictures of my binder and the basics of how it was put together, with the promise that this time I’d start giving you pages for download.

Let me start with the super basic:

a 2013/2014 year at a glance monthly calendar.

-2014ATAGLANCE copy

-2014ATAGLANCE

This PDF (link ^^) downloads a single standard printer page with both a monthly 2013 and 2014 calendar that you can cut in half to fit into your mini binder.  I recommend printing this out on cardstock for durability.

Simple enough right!?

OK, the next couple are pretty basic and standard parts of a home management binder, but they get a bit more complicated simply because I’m giving them to you in multiple download options.

Step 1)

Family information sheets:

Document1 copy

You know, the pages in the front of every planner that no one ever fills out?  Yeah these are those.  Except, here’s the thing.  They really are important.  This set of downloads contains sheets with the following information:

1) Family Contact Information (as seen above): a place to write down the contact information for each member of your family

2) Family Medical Information: space for name, date of birth, medical conditions, allergies, current medications, and blood type.  Depending on your family members this may be basic and have little to list, or, if you have family members like me, it’s long and contains tons of info, all of which you never know when you may need.  In the event of an emergency it’s always good to have this written out, it prevents you from forgetting anything, or circumstances may mean that you can’t tell the doctors/emergency medical personnel yourself, but hey look, there it is right there in your binder!

3) Emergency Contact Information: write out your address, subdivision name, directions to your home from the closest highway/major intersection.  Leave this with the baby sitter, or make sure your kids know where to find it in case anyone needs to call 911.

4) Emergency phone numbers: Medical, Fire, Police, Poison Control, pediatrician, doctor, dentist, pharmacist, all in one easy to find place.

I’m giving you this set in two formats, the first is a PDF (Document1), it will download and print with blank lines (like in the picture) for you to handwrite everything in.   The second is a customizable word (.docx) file (Document1) that you can download, open in MS Word, and customize by typing in your information.  I recommend printing these on cardstock for durability as well.

The second set of documents I’m going to give you will either require the most or the least amount of customization on your part, it’s my cleaning control journal.  I have always had the most success in keeping my home clean when I use FlyLady‘s methods.  Over the years I have stopped and started routines of keeping my home clean more often than I’ve stopped and started diets.  Each time I’ve learned something, and this latest control journal is the culmination of my lessons to date.

newcontrol copy

Now, here’s the thing odds are everyone’s cleaning routine is going to look different.  So, I again have made mine in two formats.  If you just want a place to start you can download the PDF (newcontrol), if you’re looking to make something your own go for the MS Word version(newcontrol) and customize to your hearts content.  These printables include:

1) Morning, Afternoon, and Evening Routines

2) A Basic Weekly Plan

3) Zone cleaning checklists

4) Seasonal and Yearly reminder lists

I recommend printing these on standard paper, but then putting them in sheet protectors.  That way you can use a dry erase marker and cross off things as you accomplish them while still being able to reuse the same lists.

Everyone’s homes are going to require something different, but this is my latest installments.  If you’d like to look at FlyLady’s original Control Journal guidelines, you can see them here.

Looking for other installments in the Home Management Binder series?  You can find them here:

Part 1

Part 2

Part 3

Part 4

Word of Mouth: Product Love

Every now and then you stumble across something that you totally love and want to tell the world about – that’s how I feel about the following.  Just wanted to share the love.

Here in SA we have HARD water, and our house is not equipped with a water softener.  This creates a whole host of challenges for me, but one of the biggest (and most unforeseen honestly) was how fast it made our toilet dirty.  Seriously, if I wanted a shiny white toilet bowl I need to clean it every day, otherwise mineral build up happens fast and looks AWFUL!

Well, long story short, I’m not an every day toilet bowl cleaner kind of gal, which means through the years I’ve tried LOTS of stuff to both keep my toilet clean, or when that (obviously) didn’t work, to get the build up off and get it clean.

Nothing, and I mean NOTHING, out there worked to get hard, nasty, stuck on build up off like the BathStone from EarthStone

bath-stone-main

I looked at this so many times in the isle at the grocery store, had it in my cart and put it back, and now I could kick myself for not getting it sooner.  I couldn’t help but wonder how a block of pumice wouldn’t scratch my toilet and then make the problem worse, or that I’d be there scrubbing for hours and make no difference.  Oh my was I wrong.  I love that this is all natural, involves ZERO chemicals or other cleaners in the process, doesn’t harm the toilet, and most of all WORKS and fast.  Even after the worst of the nasty build up the BathStone gets the bowl clean and sparkling in no time, and a single cleaning block lasts for LOTS of uses

Down side, I still have to clean it all.the.time to keep it that way – or at least I used to…

full_toilet_cleaning_gel.jpg

Another product I looked at and didn’t buy several times.  Now I always have a package in my cleaning box.  The only two cons I have regarding the product: 1) it’s scented, I really don’t like my bathroom to smell like “fresh scent” all the time (I prefer it not smell like anything but if it has to, I’d rather it be citrus or something less chemically smelling) 2) there is now always a big blob of chemicals in my toilet.  Thankfully I don’t have small kids who play in my toilet or pets that drink out of it, but since I really really  try and stay away from non-natural cleaners completely having a big blob of chemical in my toilet is pretty gross to me.

On the other hand, my toilet now sparkles and shines all the time with almost no work from me., thats a victory in my book however it comes.

The other thing I can’t stop singing praises for has nothing to do with bathrooms or cleaning, and will actually save you money.  Let me tell you about my new friend Plan To Eat

So, Pinterest is great, I love pinterest, and I have 25 boards devoted to food, menu planing and kitchen/food tips.  However, I almost never cook from those boards because they are scattered about (despite my best efforts to organize them) and I have to go to that many different sites to print the recipes etc. etc. etc.

Well, not any more.  Plan to Eat lets you input recipes from all over the web (or manually type in your family favorites from cookbooks you own, and recipes you’ve made yourself etc.) and it collects them in one spot that is easy to navigate, organize, print recipes from, and you can share with “friends” on the site as well.  But wait there’s more (lol) they also have built in drag and drop menu planning, and then the menu you build generates a shopping list.  That shopping list can also be customized to include household goods and pantry staples that wouldn’t otherwise self generate so you can print one list from the site (or access it from your internet capable mobile phone etc.).  Seriously I am in LOVE!  Extra bonus, you can try it for free for 30 days before it charges you (although the $5 a month is totally worth it, and they also have yearly plans that make it less expensive) which gives you plenty of time to play around with it, import recipes, and decide if you love it or not.

Go give it a try (and when you sign up, add me as a friend user name: kaugomu)
Simple Meal Planning - Plan to Eat

I love it so much that I am slowly working on importing my hundreds of recipes from Pinterest and deleting them from my boards. 😀


Anything out there you’ve fallen in love with and want to share?


signature


**Disclaimer, this post is not sponsored and these opinions are entirely my own.

Life Management Binder: Part 2

Last time, I introduced my planner, and gave you a list of supplies.

Today I’m going to show you my planner and give you a list of alternatives and examples.

Next time, I’m going to start giving you the pages to download. 🙂

Yes, I’m taking this super slow – that way I hope not to burn out half way through and never finish (I’ve been known to do that more than once)

IMG_4891

This is my binder, and gathered supplies.  You can see: standard printer paper, mini binder filler note paper, the actual binder, a whole punch guide, the cover from the calendar I took apart to make my planner (it looks pretty, didn’t just want it to go to waist), sheet protectors, scissors, single hole punch, dry erase marker, pencil, dividers (I made my own), my planner/calendar pages and dividers.

IMG_4892

Basic structure, start with an empty binder (I also have this handy Post-It stick in pocket/pouch thing in mine it’s not required and since a friend gave it to me I don’t even know where she got it)

IMG_4893

I knew I wanted my calendar pages in the back, so I added all the pages and 12 monthly dividers first.

IMG_4894

IMG_4895

I then added my other dividers in front of the planner section.

IMG_4896

Lastly I chose to take the cover from the calendar I took apart and put it in the very front of my binder, it’s nice to look at, adds a bit of color, and also adds a layer of strength/protection to the front so I’m not opening directly up to my tabs and information.

That is it for the basic set up of my binder.  As for what goes behind those tabs in the front, we will get to that starting next time, for now I’m just giving you the nickel tour of what my binder started as.

Now, if you want other options, inspiration, or  a single downladable bundle (and are willing to pay for that) here are some of my favorites from around the web (I have lots more pinned on my Cleaning and Organizing board on Pinterest) in no particular order.

Harmonized_House_Pack1

Love the color combination of these customizable PDF sheets.

theprojectgirlcom-dailyplanner

The Project Girl has LOADS of printable organization tools in her downloads section!

Double-Planner

I like the simplicity of this side by side (a single large sheet is also available) daily planner from Andrea Dekker.

daily-docket-example

Simple Mom’s Daily Docket.  She has an original, revised, and smaller version available (the smaller or Pocket Docket would actually work perfect in this sized binder) which are all available in her downloads section on her site.
birthdayanniversary

This is a sweet, simple printable set from Blooming Homestead with a very calming color scheme.

2013_Life_Planner_Challenge_Photos_New

If I were willing to pay $40, this is the kit I would buy.  It’s formatted for a mini binder (just like we are working on) I LOVE the color scheme, and she has great instructions on how to make the finished product durable and professional looking.  But I’m not willing to pay that much for something I can (obviously) make myself – especially since her bundle is simply the downloads, you still have to print, assemble and pay for all the components as well.

Looking for other installments in the Home Management Binder series?  You can find them here:

Part 1

Part 2

Part 3

Part 4